
Principle of Dumpy Level Instrument:
The dumpy level operates on the principle by establishing a visual relationship between two or more points, through an inbuilt telescope and a bubble level. The desirable level of accuracy can be achieved through steps.
It is also called through various names such as Surveyors levels, Builders level, Dumpy level, or even its pre-historic version “Y(Wye) Level”.
Accuracy of Dumpy level over other leveling instruments:
The prime reason for using the Dumpy level over other leveling instruments is its accuracy.
A dumpy level is known for high accuracy values for most of the Tacheometric methods. The accuracy of a dumpy level can be within 1:4000 for every 100 m.
Use of Dumpy level in Surveying:
Dumpy level holds significant importance in the surveying of a construction site. The level of accuracy and handiness of the dumpy level has made it a prominent choice amongst surveyors.
- The prime reason for performing leveling on a construction site is to make the field level and even.
- To determine the differences in height between two points.
- To measure the height and distance of different locations of surveying land through the principle of relativity.
- To measure the following distance amongst various points on the surveying land.
- Setting out levels and inclined surfaces for construction.
- To draw contours on land.
Important Components of Dumpy level:
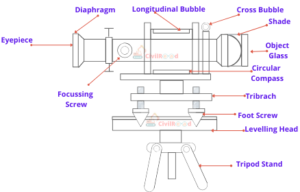
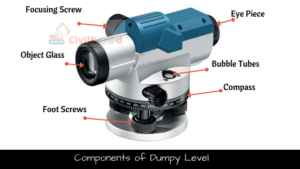
1. Telescope:-
The telescope is used to measure distant objects in the line of sight. The telescope is generally connected with vertical spindle, facilitating telescope to be movable in various directions.
Telescope comprises of various parts, all the parts are described below.
Telescope comprises of various parts, all the parts are described below.
- Eye Piece: It comprises of a magnifying glass and is primarily used by the observer.
- Objective Piece: it is placed at the farther end of eyepiece. It comprises a convex lens and a concave lens.
- Diaphragm: Provided in the outline of the eyepiece with the cross of dark metal. They are provided to the bisect object.
- Focusing Screw: They are meant to align the focus and image clarity of the object.
- Ray Shade: Prevents sunlight from entering the objective lens.
2. Bubble Tubes
They are provided to align the level of instrument. Provided by bubble tubes on horizontal and vertical direction. The instrument is ready to survey when both the bubbles are in the center.

3. Compass
It is used to determine the magnetic bearing of the line of the path of the survey. The compass comprises a pointer on marking of directions. The compass is aligned for the magnetic bearing in the north direction.
4. Vertical Spindle
Located at the center of the instrument. It helps the telescope to rotate in the vertical direction. Vertical Spindle is meant to be a conjunction point between tripod and telescope.
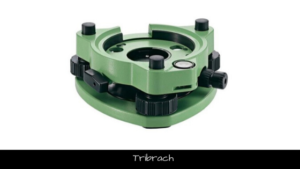
5. Tribrach
It is parallel to the leveling head and primarily utilized to adjust the horizontal level of the instrument. The trivet is connected through foot screws.
6. Foot Screws
The foot screws are used to calibrate the instrument through the bubble tube. Adjusting foot screws one can calibrate the tribrach plate. To ensure the bubble is at the center, foot screws are operated.
7. Leveling Head
Also known as a trivet, it comprises of two triangular plates aligned parallel to each other. Comprises of groves to hold foot screws.
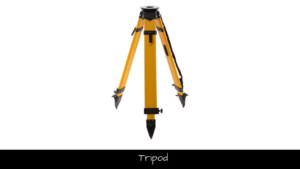
8. Tripod
Tripod is the supporting medium of the complete dumpy level. Comprising of three legs made of hollow steel sections or light or hardwood. Steel shoes provided at the foot ensures that the tripod is immobile with slight jerks.
The procedure of surveying on Dumpy Level:
The step by step procedure to perform the surveying using Dumpy level. Survey through a dumpy level can be easily conducted over a site. The dumpy level is a two-man procedure, one may require at least an assistant to proceed with the operation. Below listed types of equipment are the ones that one requires to initiate the surveying operation.
- Dumpy Level
- Tripod with foot screws.
- E-meter Staff/ English Staff
Once the above instruments are available, the surveying operation can proceed. The following steps need to be followed to complete with the surveying operation.
Setup a Benchmark [BM]:-
The process of surveying starts from a specified benchmark with already known height concerning Mean Sea Level (MSL). This previous data of benchmark can be acquired from previous surveys. Benchmark data is usually found on churches, govt buildings, municipal offices, Railway station boards, etc. If data is not available, one may choose an arbitrary point (temporary benchmark like a fence post, etc) with an assumed height.
You can look up the benchmarks of your location from here

In the above Railway Board, you can see the Mean sea level is mentioned.
Location and Position of Dumpy level:
Select a place where you have a clear sight of the benchmark. It is recommended to set up the instrument in the center of the land where you can see all the site including the benchmark.
Setting up Dumpy level on Tripod:-
The Tripod has to be placed firmly on the ground so that it can efficiently hold the dumpy level. In general, the tripod height must be adjusted up till eyesight. One must ensure the legs of the tripod stand are wide enough to hold the instrument properly and legs are properly inserted into the ground.
The dumpy level is to be firmly and securely fixed with the tripod stand through the foot screws. One must ensure that the device is tightly fixed with a tripod. Since the level head is very sensitive, and the instrument is very costly, special care should be taken while handling it.
To work efficiently, the Dumpy level must behold in the complete horizontal direction. Foot screws aka Levelling screws could be used to set a leveled condition. The leveling screws must be adjusted until the alignment bubble is aligned in the center of the marking level. To bring the bubble in the center, leveling screws are further adjusted.
Observations and Readings:-
Backsight [BS] Reading:
The first reading which the surveyor needs to take is back sight. Backsight reading helps you to find out the height of the instrument(H.I.). These two readings enable us to proceed with further foresight level readings. The second man (assistant) should hold the staff “vertically” on the benchmark. The operator begins the surveying operation by viewing through the eyepiece of the telescope and rotate the dump level until the crosshairs are lined up with the E staff. Then look and focus to see the numbers on E Staff. The staff comprises of both metric and imperial measurements. The “E” marking on the staff signifies 5 cm as of metric scale.
Height of the Instrument (H.I.) or Height of the Level:
To find out the height of the level, you must know the height of the backsight which we have noted in the previous step. Now add the benchmark height to the backsight height which will give you the height of the instrument.
Height of the level = Bench Mark(BM) height + Back Sight Reading
Foresight readings:
After finding the height of the instrument you are now ready to proceed with the foresight readings. Locate and mark the points (A, B, C) on the ground at which you intended to find out the level. Place the E Staff on the selected point (Suppose ‘A’) and hold it vertically. Repeat the same procedure of taking readings from E Staff which we performed to find out the backsight height. Record the readings from E staff and find out the foresight height of (Point ‘A’).
Calculating the Reduced level:
The reduced level is the difference between the Height of the instrument and Foresight reading.
Reduced Level = Height of the instrument – Foresight reading
The results are tabulated in the below table.
| Reading No. | Identification point | Benchmark Height | Backsight | Height of Instrument | Reduced Level |
|---|---|---|---|---|---|
| 1. | |||||
| 2. | |||||
| 3. | |||||
| 4. |
This reduced level gives a report about the quantity of backfill that needs to be added or the quantity of excavation that needs to be done to make the ground even.
Example:
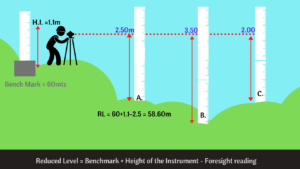
In the above image, you can clearly understand that the ground is uneven and leveling is a must to construct any structure on this land.
We considered the Benchmark height = 60mts
Height of the instrument = 1.1mts
and the foresight height of point A = 2.50m
Reduced level =60+1.1-2.5 = 58.60m.
A simple task for you find out the reduced levels of points B and C from the above image and enter your result in comments.
Precautions while setting up Dumpy level:
The dumpy level is all about levels. Necessary precautions should be taken while handling the instrument. If not instrument will go out of level and process inaccurate results.
- The tripod must be adjusted till eye height.
- Try to avoid touching or applying pressure on the tripod while moving around.
- When moving around the tripod, make sure you don't trip over the legs.
- Keep checking the bubble, minute fluctuation in a bubble gives inaccurate results.
- Avoid setting up the instrument on soft ground.
Advantages of Dumpy Level:
The dumpy level is amongst the most famous used surveying instrument. The prominent advantages of dumpy level are as follows:
- Simpler construction with minimum movable parts
- Minimum adjustments are to be made
- High rigidity makes it versatile for long-duration surveys
- High optical power
- Cost-efficient in terms of usage on diversified construction sites
Limitations of Dumpy Level:
Despite being such a versatile instrument, the Dumpy level even has some limitations. These limitations minimize the application to a certain extent.
- Limited to the site with horizontal angle measurement
- There might be a certain level of discrepancies in the values obtained.
