Showing posts with label Brick construction. Show all posts

Saturday, March 7, 2020

Calculation of Safe Bearing capacity of soil on site | SBC Values for Different Soils

Safe Bearing Capacity of Soil:

The First test which one should be performed before construction is the safe bearing capacity of the soil. It’s a preliminary test that should be conducted before the construction of any structure. It is recommended that the safe bearing capacity of soil should be tested at all the points of footings.

What is a Safe Bearing Capacity of Soil?

A safe bearing capacity of soil field test is done to check the capacity of the soil to withstand loads. Let us consider an example of a small plastic chair, This small plastic chair is made for kids and It can bear a capacity of 10 Kgs. Suppose, if an adult sat on it, then Chair will be broken. The same case is applied to the soil, If more load is applied on soil than its resistance, then soil starts displacing or breaking which leads to settlements. In order to keep the structure safe, the Safe bearing capacity of a soil is calculated on the field at different points and the selection of footing is done accordingly.
The maximum load per unit area which the soil can bear without any displacement or settlements is designated as the “Safe bearing capacity of the soil.”

Safe Bearing Capacity of Soil formula:

Safe Bearing Capacity of Soil Formula

Ultimate Bearing Capacity of Soil:

The point at which soil starts displacing is called the Ultimate bearing capacity of the soil.
For Example: Take a rubber band and stretch it oppositely, Rubberband has an elastic property which it can regain back to the original position. If u start stretching it more, it may break at a certain point, that point is known as the Ultimate point of Rubberband where it loses its elasticity and it won’t come back to its original position.
rubber band theory
The same can be applied to the soil, Soil has an ultimate bearing capacity where it can bear the load up to a certain point. After that point, Soil starts displacing (Settlements). That point is called as Ultimate bearing capacity of the soil.
The ultimate bearing capacity of soil varies with the type of soil and the atmospheric conditions.
The factor of Safety depends upon the type of construction and it usually ranges between 2 and 3. For High rise constructions, we go with F.O.S 3.

Safe Bearing Capacity of Soil Testing Procedure:

Well, so many theories explained how to find the safe bearing capacity of the soil. Among them, the Drop weight method is the easiest and reliable test.

Drop weight method:

This method is the field test for the Safe bearing capacity of the soil.
  1. Firstly Excavate a pit of required depth. (preferably equal to the depth of foundation)
  2. Take a square cube of known weight and dimensions.
  3. Now drop the square-cube on the pit with a known height.
  4. Measure the impression made on the pit by square cube using the scale.
    (For accurate results, Drop the cube several times on the same pit and calculate the average depth of Impressions “d”.)
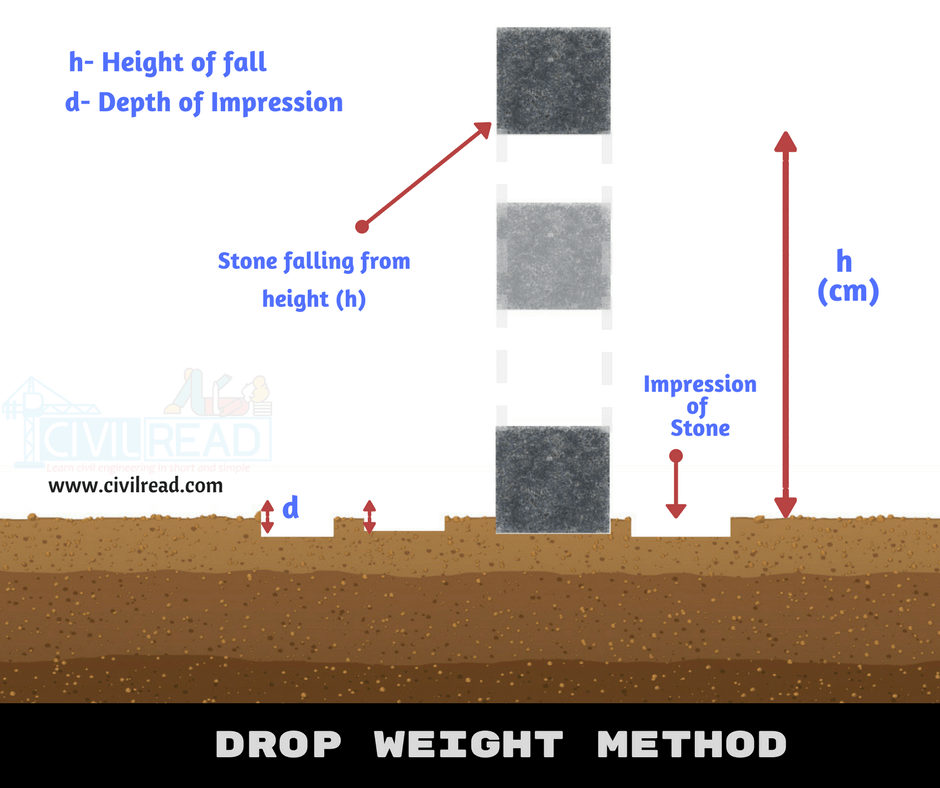
drop weight method - Soil bearing capacity

Example:

Weight of Cube = 0.6Kg, Height of fall = 120cm
Depth of impression = 0.8cm;
Cross Section Area (A) = 20cm2; Factor of Safety=2
Ultimate Bearing Capacity [UR] = [0.6 x 120]/0.8 = 90Kg
Safe Bearing Capacity of Soil = 90 / [20 x 2] = 2.25Kg/cm2

Why calculate the Safe bearing capacity of the soil before starting construction:

Liquefaction
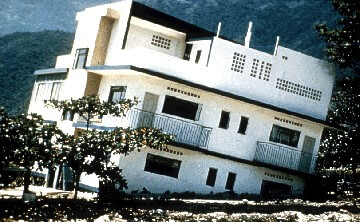
From the above figure, it is clear that the building is fallen on only one side. It is occurred by the settlements on one side of the building, due to this the building is overturned on one side but didn’t collapse.
The reason for this is The safe bearing capacity of the soil is enough at one part of the building, but not the other part. It is recommended to check the SBC of soil at all footing positions to overcome the Soil Liquefaction.  And the perfect type of footings is chosen by checking the Safe bearing capacity of the soil.

Safe bearing capacity (SBC) Values for different types of soils:

These are probable values that are only used only for preliminary design. The actual safe bearing capacity of the soil is calculated by using IS mentioned Codes.

Friday, February 28, 2020

How to Calculate Steel Quantity for Slab, Footing, and Column?

Estimation of steel reinforcement quantity for concrete slab, footing, and column, beams, etc. is crucial for the cost evaluation for the construction. Design drawings are used as a base for computing rebar quantity in different structural elements.

This article presents the steel quantity computation process for slabs, columns, and footings.

Calculate Steel Quantity for Slab

Obtain slab dimension and reinforcement details from design drawings as shown in Fig.1.
Compute the number of steel bars.

Main Steel Bars


No. of bars= (Slab length(L)/spacing)+1 Equation 1

Shrinkage and Temperature Steel Bars

No. of bars= (Slab length(S)/spacing)+1 Equation 2

In equation 1, the center to center spacing of main reinforcement steel bars are used and shrinkage and temperature bar spacing is used in equation 2.


Fig. 1: Types and arrangement of steel bars in one way slab

3. Calculate cutting length:

Main steel bars

Cutting length= clear span(S)+Ld+inclined length+2×45 degree bend Equation 3

Shrinkage and Temperature steel bars

Cutting length= clear span(S)+Ld+inclined length+2×45 degree bend Equation 4

Where:

Ld: development length which illustrated in Fig. 2.

Inclined length can found from the following expression:

Inclined length= 0.45D Equation 5


D=slab thickness-2*concrete cover-bar diameter Equation 6


Fig. 2: Bent up bars in slab

  • 3. Convert that length into kilograms or tons because steel bars are ordered by weight. The same equation used for both main and shrinkage and temperature reinforcement, but corresponding cutting length, number of bars, and bar diameter is used.

Main steel bars=No. of bars*cutting length*weight of the bar (/162) Equation 7

(/162) is the weight of steel which is derived from steel volume times its density which is 7850 kg/m3.

Calculate Steel for Footing


The size of the footing and its reinforcement details (bar size and spacing) shall be known. This can be achieved from design drawings. After that, the following steps will be taken to compute the steel quantity.

  • calculate the required number of bars for both directions.


No. of bars = {(L or w – concrete cover for both sides) ÷ spacing} +1 Equation 8

where L or W: length or width of the footing

  • Then, find the length of one bar

Length of bar = L or W–concrete cover for both sides + 2*bend length Equation 9

Where L or W is length or width of the footing
  • After that, compute the total length of bars which is equal to the number of required bars multiply by the length of one bar. If the same size of bars is used in both directions then you can sum up both the quantity of the bars
  • Convert that length into kilograms or Tons. This can be done by multiplying cross-section area of steel by its total length by the density of steel which 7850 kg/m3

The above calculation procedure is for a single reinforcing net. Therefore, for footings with the double reinforcing net, the same procedure need to be used again to compute steel quantity for another reinforcing net.

Calculate Steel Quantity for Columns

Achieve column size and reinforcement detailing from design drawings. Then, compute the quantity of steel in the column using the following steps:

Longitudinal steels

  1. Compute the total length of longitudinal bars which equal to the column height plus laps for footing multiply number of longitudinal bars.
  2. Convert that length into kilograms or Tons. This can be done by multiplying cross-section area of steel by its total length by the density of steel which 7850 kg/m3

Stirrups

  • Compute the cutting length of stirrups using the following equation

Cutting length=2*((w-cover)+(h-cover))+Ld Equation 10

where:

w: column width

h: column depth

Ld: stirrup development length

  • Calculate the number of stirrup by dividing column height over stirrup spacing plus one.

  • Estimate the total length of stirrup which is equal to stirrup cutting length times number of stirrups.

  • Convert that length into kilograms or Tons. This can be done by multiplying the cross-section area of steel by its total length by the density of steel which 7850 kg/m3.

Total steel quantity of columns equal to the sum of both main and stirrup steels.

Monday, February 24, 2020

Rat Trap Bond – Construction, Advantages, and Disadvantages

Rat trap bond is a modular type of masonry bond in which the bricks are placed in a vertical position which creates a cavity in the wall while maintaining the same wall thickness as that of the conventional brick masonry wall. It is also known as a Chinese brick bond.

The purpose of using this type of masonry bond is to reduce the number of bricks and mortar required as compared to the English/Flemish bond because of the cavity formed in the wall.

Fig 1: Rat Trap Masonry.

Architect Laurie Baker introduced it in Kerala in the 1970s and used it extensively for its lower construction cost, reduced material requirement and better thermal efficiency than conventional masonry wall, without compromising the strength of the wall.

In this article, we discuss the material criteria, construction, advantages, and disadvantages of rat trap bond masonry.
Selection of Bricks

The criteria that are set for the selection of bricks is of utmost importance as less number of bricks are used in the construction of rat trap masonry.

The size of the bricks used must be of a standard size and variation in size is not accepted. The acceptable sizes of brick in Indian scenarios are – Length 220-250 mm, Width 100-115mm and Height 65- 75mm.
The edges and corners of the bricks must be straight and sharp and perfectly rectangular in size.
Having a uniform size of bricks is important as the masonry is the modular type and to achieve good strength and finish.

Table 1: The material strength requirement Rat Trap Bond


Type of Construction

Recommended Compressive Strength of Bricks Best Practice Minimum Allowable

Recommended Mortar Ratio


Load bearing, Double storied


40 – 50 kg/cm2

1:5

Load bearing, Single storied

35 – 40 kg/ cm2

1:4


Infill masonry in frame structure,
no restriction on number of floors

Min 35 kg/ cm2

Not less than 1:4

Construction of Rat Trap Bond
The bricks are placed in a vertical position so that 110 mm face is seen from front elevation, instead of the 75mm face (considering brick of standard size 230 X 110 X 75 mm).
As the width of the wall is kept as 230mm, a cavity is created inside the wall.
However, the first and the last layer of the masonry is constructed as the convention sold masonry.
In the sill, lintel and sides of openings are made of solid masonry (without cavity) for fixing of frames.
To strengthen the masonry, vertical and horizontal reinforcement bars are provided in the cavities.
Electrical conduits and plumbing pipes, with prior planning, can be put inside the cavity for better aesthetics.

Fig 2: Construction of Rat Trap Bond

Image Courtesy: ArchitectureLive!
Advantages of Rat Trap Bond
The cavities in the masonry act as thermal insulators. Thus, the interiors remain cooler in summer and warmer in winter.
Rat Trap masonry uses fewer bricks and mortar reducing the cost of masonry up to 30% when compared with conventional brick masonry.
The number of bricks used in the construction of rat trap masonry is 470, whereas, in conventional masonry, it is 550.
Walls constructed using rat trap masonry can be used as load-bearing as well as a thick partition wall.
Rat-trap bond when kept exposed, creates aesthetically pleasing wall surface and the cost of plastering and painting may also be avoided.
As this type of masonry has 30% of cavities, the dead load of the structure is reduced which in turn reduces the structure supporting members such as column and footing.
In case of more structural safety, reinforcement bars can be inserted through the cavity until the foundation.
Many buildings that were constructed decades ago have proved that this type of walling technology is durable and the maintenance costs are low.
Disadvantages of Rat Trap Bond
Due to the formation of cavities in the masonry, the building does not provide good sound insulations.
Skilled labor is required to construct this type of masonry.
Frequent cleaning of external surface required if not plastered.
Special care and attention to be given while designing and constructing rat trap bond masonry.